Wednesday, July 30, 2014

A Krautin We Will Go! Even when its hot outside!

June and July have been really hot in New West, which has its ups and its downs. The most glorious part of all of this is that the garden is growing and I am finding myself overloaded with produce, some of which are coming in nearly a month ahead of schedule!!

I had a recent problem with my "Fall Cabbage" this problem being that they were suppose to be ready for harvest in August/September and not in the middle of July. The cabbage I have growing in my garden is an organic heritage variety known as Copenhagen Market which makes a really beautiful and large head!  If you are friends with me on facebook you have seen these two photos before.


These are my fine cabbages before they were fine sour Kraut, you can see the garden in the background, I am standing in front of a heritage corn called crystal corn and in the middle are some really big zucchini. But I digress...back to the cabbage! The idea of making sauerkraut is not a foreign one to me, I've been making it with my family since I was a little girl, the only problem was, I was used to making it in September/October when the weather was cooler and fermentation took roughly 30 days. Knowing the temperature difference put me into a little bit of a panic so I went to my favorite homesteading forum on the web which is www.permies.com (I highly suggest you check it out!). I was able to get some help from a lovely lady in Atlanta who makes kraut all times of year, the rule for fermentation was this:

  • 1 day of fermentation per every 10 degrees above the freezing zone (35 to 37 Fahrenheit, not enough to completely freeze, but enough to keep fermentation slow)

  • Ingredients:
    • Cabbage
    • Salt
Knowing that it was around 85 degrees outside I knew that it would take roughly 5 days to ferment - mind you, I did this for 15lbs of raw cabbage, you would have to experiment a bit (watch and taste your fermented mix every day or so).

Here is a photo of some of the cabbages, as you can see they were so large and over ripe that some cracked! I was able to cut off the brown edges and then slice them fine for the kraut.


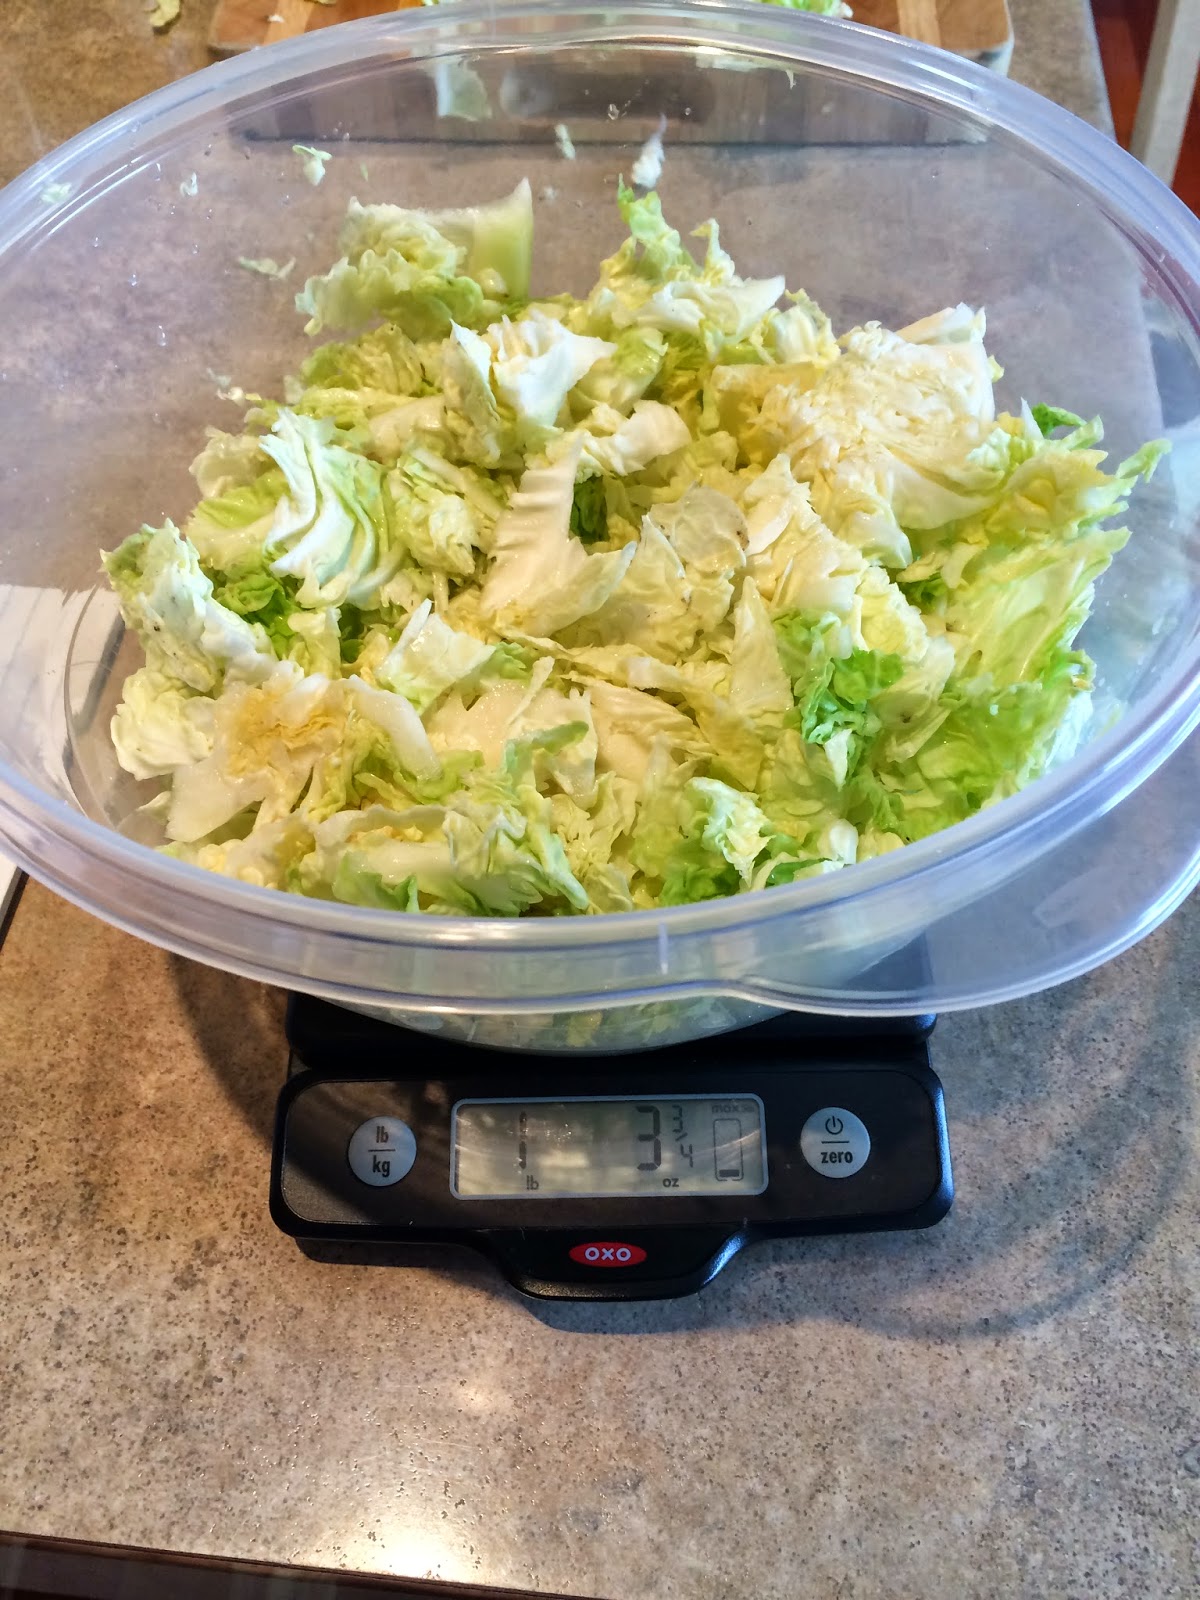
The next step was a pretty important one, weighing the kraut AFTER it is cut up. You can use a digital or regular kitchen scale and don't forget to first weigh your vessel so that you can subtract it from each weight measurement.

I divided all the fresh sliced cabbage into 1 lb. increments, put it into the stone crock and then added 2 tsp. of salt. The salt I used was raw Celtic sea salt, this is a far better alternative to iodized salt as it has all of its nutrients and minerals in tact.

  • 1lb of Cabbage ='s 2 tsp. of salt.

At this point you take a masher and begin to pound your 1 lb. of cabbage with your 2 tsp. of salt, the masher is usually wood with an X shape, flat panel with holes drilled into it, or in my case, a triangle that does not fill the entirety of the bottom. The goal in pounding the holy living begeez out of your cabbage is to cause a chemical reaction in which enzymes are released and are mixed with the salt, thus starting the fermentation process. Each lb. of cabbage needs to be pounded until liquids are released. After this you add each additional lb. repeating the same action. When all the cabbage is in you continue with the mashing until fluid can rise over the top.

Allow for me to demonstrate!


As one can tell, I am a bit off my rocker, but I DO love cabbage. Once your fluid is over your cabbage you will want to get it ready for the fermentation process. At this point I take a clean piece of cheese cloth and lay it over the top of the cabbage, followed by a plastic bag to cover all the edges. Next I take a large 1 gallon zip lock bag and fill it with water, placing it on top to give weight and to keep pressing the cabbage down. And finally a thick kitchen towel to keep it all snug.


Keeping in mind the temperature I left it for about 5 days in my dark pantry (I like mine to be very krauty tasting). Please keep in mind that if you make kraut in the fall the time for fermentation will vastly increase, in cold temperatures it can take as much as 30 days.

Here is a photo of my finished product:


Please note: Sometimes a mildew will form at the top while you are fermenting your cabbage, please do not fear the mold, simply scrape it off and toss it out, then dip your greedy little hands into the vile smelling mix and taste of the glorious fruits of your labors! If you leave it too long it will taste a bit off, if its not done it will taste like salty cabbage - remember, you are going for that pickled and fermented taste that we all love so very...very much.

Once your cabbage is done you can place it into appropriate sized jars for keeping. Remember, you will want to sterilize your jars in boiling water for 5 minutes and wash your rims and lips in hot soapy water. Fill your jars leaving 1/4 inch for head room and making certain that you are packing the kraut down so that the liquid covers all the cabbage. When this is through you will need to secure the lids and process the jars in a boiling water bath for 20 to 25 minutes.

Your Kraut will keep for a year + in your cupboard.

Enjoy!
- Nicey <3


Monday, July 21, 2014

Lady's Mantle - A Ladies Best Friend (June Flowering)

Its herb season and my herbs are growing at insane proportions in the herb bed. I have an over abundance of mint, thyme, marjoram, rue, sage, lobelia, calendula, sorrel, lemon balm, echinacea, and as of recently, lady's mantle.


The picture above is of the lady's mantle growing in my garden, this photo was taken about three seconds before I took my garden trimmers and butchered the new leaves and flowers (of course leaving some on the plant). Lady's mantle is an amazing herb which is used for the treatment of many issues associated with menses, fibroids, infected and weeping wounds, and many other things which I will visit later in the post.

Lady's mantle is most definitely my favorite herb for June, its beautiful green leaves and soft yellow flowers are soft and fresh and reminds me of the warm months and long days ahead.

I would like to post one local herb a month (poke me if I fall behind) and give the full monograph for its use . So, without further delay, here is some relatively boring info about an amazing medicinal plant.


Latin Name: Alchemilla monticola
Family: Rosaceae
Common Name: Lady's Mantle, Lion's Foot, Bears Foot, Nine Hoots, Leontopodium, Stellaria
Related Specie: A. arvensis, A. alpina

Botany:
Habitat: Native of the American Andes, common to Britain and the colder regions of North America, and on high-lying ground, being found up to an altitude of 3600 feet and freely found beyond the arctic circle in  Europe, Asia, Greenland, and Labrador.

Description: A perennial plant, the rootstock is black, stout, and short, the plant rising from it with slender stems. The whole plant is clothed in soft hairs. The lower leaves are large, 6 to 8 incesh in diameter and have slender stalks 6 to 18 inces long, the leaves being somewhat kidney shaped with scalloped edges. The flowers bloom from June to August and are numerous and small, only about 1/8 of an inch in diameter, being yellow/green in color in loose and divided clusters at the end of the branching stems.

Cultivation: The plant grows from a seed planted in the spring or from root clippings.

Parts Used: Leaves, Flowers, Root

Harvest: The whole herb is of use and is best in June -hang to dry. Root is harvested in the fall and should be used fresh.

Medicinal Actions: Astringent, Styptic, Vulnerary, Diuretic, Anti-inflammatory, Emmenagogue, Vulnerary, Hemostatic, Alterative, Menstrual Regulator, Tonic, Anti-Pyretic, Anti-Hemorrhagic, Digestive Tonic.

Constituents: Flavonoids, Tannins (mainly ellegitannins including dimer agromoniin and laevigatiin), Glycosides, Ellagic Acid, Salicylic Acid

Pharmacy: (Consult an Herbalist for Dispensing)
Tincture:  1:5 in 25% alcohol, dispense at 2 to 4ml 3 x daily. May be taken up to 1:1 concentration
Infusion: 2 tsp. dried herb to 1 cup boiling water. Steep 15 minutes, drink 3x daily
Dried Herb: 2 to 4g daily
Vaginal Douche (Cause everyone wants to know this): 2oz infusion to 2 pints (60g dried herb to 1 liter water). Boil water, infuse for 30 minutes. Allow to cool to a comfortable temperature, inject warm for leucorrhea, candida, inflammation.

Uses: Most commonly used as a female medicine, this herb can be used for the following.
  • Acute diarrhea
  • As a gargle or mouthwash after teeth extractions
  • Mouth Sores
  • Mouth Ulcers
  • Laryngitis
  • To stimulate appetite
  • Peptic Ulcers
  • Gastroenteritis
  • Internal Bleedings
  • Colitis with Bleeding
  • Hormonal Balancer for Irregular Menses
  • Menstrual Cramps, Fibroids, Endometriosis
  • Symptoms of Menopause
  • Vaginal Douche for Candida
  • Topically for bleeding
  • Topically for weeping eczema
  • Topically for Sores, Wounds, and Cuts
  • Rheumatism
Warnings and Contraindications:
  • Do not use while pregnant - it is generally used to aid labor
  • No drug interactions reported

To Cover My A$$:
  • I am not a Doctor, I am a student of Herbal Medicine. The above information is not meant to diagnose or treat. The gathered information is from personal knowledge and knowledge from the standard the materia medica, and from herbal tradition spanning nearly five thousand years of written information, but hey, who's really counting -right?


Sunday, July 20, 2014

Jam Without Pectin or Sugar

With school and work I've found it really difficult to make jam this year. Generally I start canning in June with strawberries, but this year had to forego due to my semi insane schedule. However, I was able to grab the tail end of the raspberry season and make enough jam for the year plus a few more for trading and gifts.

As many of you know I am pretty careful about what I put in the food I make and try to use products that are not processed and non organic, this is true for my canning as well. I do not use process sugar (I occasionally will use organic sugar, date sugar, coconut sugar, etc) and I absolutely do not use pectin (the processed gelatin powder made from the hoofs of animals, or the chemically created kind). The bottom line is you do not need sugar OR pectin to make your jam thick, the secret to jam is simply heat and time.

 On that note, I wanted to share my jam making with you so you could try it for yourself! You will notice that by cooking down your jam without sugar or pectin the taste of the fruit really stands out. If you want a weaker taste or a thinner jam, just alter the cooking time.

Raspberry Jam Ingredients:
- Raspberries
- Honey (or whatever sweetener you want to use)

I made 2 flats worth of raspberries which is roughly 20 pint sized jam jars. The ratio of sweetener to berries is really whatever you wish it to be, though I was using 1:1 (1 cup Blended Raspberry to 1 cup honey).

Here is one of the flats, purchased from the local farmers market - its the end of the season, act fast if you want to give this a go.


My first step is set-up, I wash all of my rims and tops in warm soapy water and sanitize my jars, this is done by boiling them in hot water for 10 minutes.


Next I start working on the raspberries in batches. When you have a lot it is much easier to break it down into quarters, so I mix 4 lbs of berries which reduce down to 4 cups in the blender, then add my sweetener.


You don't have to have a blender, you can mash your raspberries with a potato masher and add the sweetener of your choice when it has been mashed to a fairly smooth liquid.


The above picture is 4 lbs of blended berries with 4 cups of honey (you can use more or less, I add my sweetener when the berries have been blended and taste as I go. Remember, the berry flavor will intensify as you cook it down. From this point I use a soup ladle and pour 4 and 1/2 ladle fulls into a pot, this gives me a 1 pint jar with about 1/4 inch of head room.


The jam is cooked on medium low and once it starts to boil you must be present to stir it regularly. If you want to speed up the process, you can have multiple pots going at once, but please do yourself a favor and stagger them by 5 to 7 minutes. This means that as one jar is finishing the other will need your attention to keep from burning at the bottom before you pour it into the jam jar. Average cook time per jar is 15 to 20 minutes, you will know it is done when you can draw a line through the middle without it immediately filling in. Generally if I can say "One Mississippi" before it fills in, it is done.


When your jar is full, immediately cap it and tighten the lid. When all jars are finished you will want to process them in a boiling water bath for 10 minutes. Wipe off and store, these will last a year + in your cupboard.

Enjoy!!


Thursday, July 10, 2014

The Garden in July - What to Harvest, What to Reseed, and What to Plant for Winter.

The garden is exploding! I have artichokes that are nearly four feet high, I have completely harvested our first planting of lettuce and will soon be eating the next batch, and I am pulling massive beets from the roots bed. For this New Westminster gardener July is a time of plenty!

Here are a few photos of the garden in July:


As you can see, the beds are exploding, and the flowers and herbs are all blooming! I even took a close-up of one of 100's of lady bugs that are feasting on nasty black aphids (they seem to love the soft tender under leaf of my artichoke - I refuse to spray with harsh chemicals so between the natural spray, the lady bugs and my eagerness to squish them, the plants are coming back around).

Here is a list of what I have harvested and will be harvesting in July:
  • Peas
  • Snap Peas
  • Lettuce
  • Chard
  • Bush Beans
  • Pole Beans
  • Zucchini
  • Cucumber
  • Late Strawberries
  • Goose Berries
  • Peppers
  • Beets
  • Green Onions
  • Cabbage (Planted in April)
  • Calendula - for herbal remedies
  • Lady's Mantle - for herbal remedies
  • Yarrow - for herbal remedies
  • Lobelia - for herbal remedies
  • Cat nip - for herbal remedies
  • Oregano - for herbal remedies
  • Hyssop - for herbal remedies
  • Boneset - for herbal remedies
  • Lavender - for herbal remedies
Reseeds in  July - Early Autumn Crop:
  • Peas
  • Snap Peas
  • Lettuce
  • Chard
  • Beets
  • Onions
  • Carrots
Reseeds or plants in July- Winter Crops:
  • Cabbage
  • Beets
  • Carrots
  • Onions
  • Rutabaga
  • Florence Fennel
  • Broccoli
  • Beans - Bush/Pole (harvest in Sept)
  • Kohlrabi
  • Chard
  • Chervil
  • Collards
  • Kale
  • Turnips
  • Spinach
It is very possible to harvest and grow year round in Vancouver. Happy planting!


Wednesday, July 9, 2014

The 1-2-3's of Omega 3's (Hippocrates Institute of Health)

by Tom Fisher, RN, BA
 
 
Alpha-linolenic (ALA) acid is a type of omega-3 fatty acid found in plants. It is similar to the omega-3 fatty acids in algal oil, called eicosapentaenoic acid (EPA), and docosahexaenoic acid (DHA). Your body can change alpha-linolenic acid into EPA and DHA. Alpha-linolenic acid is also found in flaxseed oil, hemp oil, marine phytoplankton, AFA Algae (Aphanizomenon flos-aquae), chia seed and walnuts, to name a few sources. These are all good sources of this important nutrient.
Excellent Plant Sources for Omega-3s:
  • Chia seed
  • Hemp seed or oil
  • Flax seed (ground) or oil
  • Microalgae oil
  • AFA Algae (Aphanizomenon flos-aquae)
  • Marine phytoplankton
  • Walnuts
Many people believe that fish is the best source of essential fatty acids, but the high amounts of fat and cholesterol, and the lack of fiber, make fish a poor choice. Also, high levels of mercury and other environmental toxins, such as polychlorinated biphenyls (PCBs), dioxins, pesticides and herbicides have often accumulated in the fish. Therefore, fish has no place in an optimal diet. Fish oil has only two percent EPA, and has highly unstable molecules that tend to decompose, unleashing dangerous free radicals.

One of the primary reasons for the presence of omega-3 fatty acids in fish is because they eat microalgae. By taking algal oil, you get the essential fatty acids EPA and DHA directly from the source, without the heavy metals and other environmental toxins present in fish.
Health issues associated with fatty acids are largely traced to modern dietary habits of low intake of vegetables, algal oil, nuts and seeds, and a high intake of processed and manufactured dietary fats.
Long-term restriction of essential fatty acids (EFAs) has been related to several disease conditions, including diabetes, heart disease, genetic diseases such as cystic fibrosis, and autoimmune disorders such as rheumatoid arthritis and multiple sclerosis. Excess animal fats have been strongly correlated to increases in chronic diseases. Microalgae oil does not contain high levels of ALA but is very rich in DHA, providing 250 percent more DHA per unit than fish oil. This makes microalgae oil the finest source of these essential nutrients available because the oil has the optimum balance of DHA to EPA and your body puts it directly to work without the multi-step conversion processes of other Omega-3 forms.

According to the Department of Biosciences and the Sri Sathya Sai Institute of Higher Learning, in India, DHA-rich microalgae oil indicates as good a health-promoting effect as any other source.
The nervous system has a high fatty acid content. Lack of EFAs may contribute to conditions such as Alzheimer’s disease and seizure disorders.
The following are some of the functions of fatty acids:
  • Provides structural support for the outer walls or membranes of the body’s cells
  • Helps convert the nutrients from foods into usable forms of energy
  • Assists in cell-to-cell communication
  • Makes it possible for nutrients to pass from the blood through the cell walls
  • Helps substances in the cells to pass into the blood
  • Assists in manufacturing red blood cells
  • Decreases inflammation
  • Lowers triglycerides
  • Makes blood less sticky
  • Raises HDL cholesterol (good cholesterol)
  • Decreases arrhythmias (irregular heart rhythm)
  • Decreases blood pressure
  • Enhances the action of insulin
  • Helps protect against oxidation and ischemic heart disease
  • Reduces PMS symptoms
  • Assists mitochondrial function (energy-producing parts of the cells)
As one can clearly see, essential fatty acids help us in many ways. EPA is the parent of the 3-series eicosanoids that moderate the pro-inflammatory effects that are derived from arachidonic acid. Arachidonic acid occurs in peanuts, meats and animal products. An entire generation of anti-inflammatory drugs, COX-2 (Cyclooxigenase-2) inhibitors, is based on blocking the synthesis of inflammatory eicosanoids. Adding good sources of EPA is a natural way of dealing with excessive inflammation.

EPA deficiencies have been associated with neurological conditions, arthritis, heart disease, cancer, accelerated aging and autoimmune disorders, presumably as a result of direct or indirect effects of inflammatory responses that may be modulated by raising EPA levels.1 – 4 Significant improvements were noted in ADHD, autism, developmental coordination disorder (DCD), learning disabilities, and poor cognitive abilities when they were supplemented with fatty acids, primarily EPA-DHA.5 – 14 An adequate intake of DHA and EPA is particularly important during pregnancy and lactation. During this time the mother must supply all the baby’s needs for DHA and EPA because it is unable to synthesize these essential fatty acids itself. DHA makes up 15 to 20 percent of the cerebral cortex and 30 to 60 percent of the retina so it is absolutely necessary for normal development of the fetus and baby.

Improving neonatal DHA status presents a critical challenge, since this fatty acid is required for brain development,15 and the overall maternal essential fatty acid status tends to decline steadily during pregnancy.

Pregnant women have lower levels of EPA and DHA and higher levels of palmitic acid, which is in palm oil, palm kernel oil and coconut oil.16 The transfer from red cell membrane to fetus may be a special mechanism for ensuring a fetal supply of EFA.

Mothers who eat the standard Western diet may be unable to meet the high fetal requirement for EFA.17 Meanwhile, the mother is more likely to experience postpartum depression related to degradation of EFA status.18 Recent studies suggest that women who eat a diet enriched in essential fatty acids during pregnancy and breast-feeding may enhance their baby’s language development, IQ and cognitive development.

In conclusion, algal oil and some other refined blends offer sustainable sources of high quality essential fatty acids. Microalgae allow a cost-effective supply of sustainable oil feedstock and offer many advantages over traditional oilseed crops such as corn, soybeans or rapeseed.
Algae yield far more oil than traditional oil seeds, as up to 50 percent of algae’s weight can be comprised of oil. Oil-palm trees — currently the largest producer of oil to make biofuels — yields approximately 20 percent of their weight in oil.

Algae grow up to 15 times faster than oilseed crops grown on land. Algae can be grown in marginal lands, in places away from the usual farmlands and in forests, thus minimizing potential stresses to our food chain and ecosystems.

Frequent harvesting diminishes the risk of crop failures in comparison to terrestrial plants. Algae can also reduce pollution by utilizing, via photosynthesis, large amounts of potentially harmful CO2, from industrial emissions, to grow rapidly. As one can clearly see, algae are a good and healthy source of essential fatty acids.